10 DIY Creative Pencil Case Ideas (Some are Perfect for Your Kids’ Project)

A Cork Placemat for Your Pencil’s Platform

In this digital era, why do we still need a pencil case? Since it is still important for little kids to learn how to write and draw, they still need it. Whether to store their pencils (yes, including the colour ones) safely at home or to collect them before going to school, these DIY Pencil Case ideas surely work wonders.

You do not have to wait until holiday to start this project with your little ones. If they are your students, make this a class project. If they are your own little kids, you can do this DIY Pencil Case project over the weekend.

1. The French Fries Pencil Case

The French Fries Pencil Case
Source: https://hips.hearstapps.com/

If you feel like giggling at the sight of this, you are more than welcomed to do so. Inspired by all kids’ favourite meal, you can create the same container just for your pencil case. What you need are:

  • Colourful, carton papers.
  • Glue or a roll of sticky tape.
  • A sample design of an actual package for french fries from a fast food restaurant.
  • Of course, a bunch of pencils.

Following the already existing design, start cutting and glueing until you make a perfect match. Then store your pencils into this DIY Pencil Case.

2. A DIY Pencil Case From A Brush

A DIY Pencil Case From A Brush
Source: https://medium.com/

This will probably come to mind last, especially knowing the real function of this brush. However, let’s think outside the box. If you no longer use this brush but it is still in a good condition, then why not?

Of course, you do not just any brush. This one is normally used to brush the floor, so the fibres are close to one another. This will make keeping your pencils erect an easy job.

One thing for sure, though. Do not forget to wash it first before changing it into a pencil case.
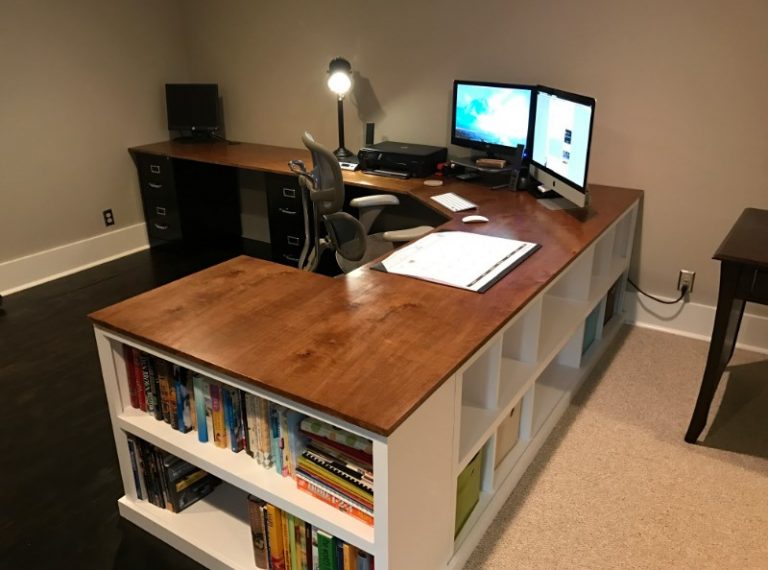
3. A Desk Organiser

A Desk Organiser
Source: https://hips.hearstapps.com/

This pencil case also has another function, which is to organise your kids’ desk at home. You can use cardboard materials or wood. For carpentry, you might want to stand by for your kids if they decide to work on this themselves.

Small, neat, and compact, you can store your pencil into one of its holes. The rest can be used for scissors and other stuff. To make it look more interesting, you can ask your kids to paint the case in any colours they like.

4. Teapots for Pencil Cases

Teapots for Pencil Cases
Source: https://medium.com/

This idea may start off an accident or a spur of the moment. More appropriate for grown-ups, this pencil case is made of a teapot. A ceramic teapot that you no longer use is better off this way.

Of course, your kids may be wondering with puzzlement. Maybe they also come up with other ideas, like with mugs and used soda cans. Knowing how easy to create their own DIY Pencil Case, let them explore.

5. DIY Multifunctional Binder

DIY Multifunctional Binder
Source: https://hips.hearstapps.com/

This DIY multifunctional binder is probably more suitable for your teenage daughter(s). Instead of creating a separate pencil case, why not be more efficient this time?

If the binder has already got an additional plastic pouch, you can just store your pencils there. If it has not, you can add it with a piece of thick plastic. Glue it to one of the plastic pages.

Once it is permanently dry, your plastic pouch is automatically your pencil case too. It is short, simple, and almost effortless. Your pencils are safely kept in your binder.

6. A Tin Can Pencil Case with Corks Attached to Its Surface

A Tin Can Pencil Case with Corks Attached to Its Surface
Source: https://medium.com/

Whether it is a used soda can or a tin one for coffee, you can use it as a DIY Pencil Case. Of course, each one also requires different ideas.

Since ribbons and colourful papers are already common, why not try something new? If you have a lot of unused bottle corks, do not let them go to waste. Start collecting them for this fun and unique project.

Using a strong, permanent glue for wood, stick the corks to the tin can. Make sure all the surface – except the whole – gets covered up with them. After that, place it on the table. It will impress many who might get a look on it.

7. A Cork Placemat for Your Pencil’s Platform

A Cork Placemat for Your Pencil’s Platform
Source: https://medium.com/

Almost similar, this so-called pencil case is made of cork. To be more precise, it is a pile of cork placemats. This material also helps to make your pencils look better as part of an artistic display.

Creating this DIY Pencil Case is easy. Start creating small holes on one surface. These will be you pencils’ platform as you make sure they stand erect with their ends jammed into the hole.

8. The Old Floppy Disks for a DIY Pencil Case

The Old Floppy Disks for a DIY Pencil Case
Source: https://medium.com/

Nowadays, people use flash disks or USB. Others prefer external hard drives or trying not to save too much into their computers or laptops. What to do with these unused, old floppy disks?

To create a DIY Pencil Case like this, you need:

  • Five floppy disks.
  • A drill.
  • Zip ties.

Put the wholes into the right corners of each disk before tying them up together with zip ties. Once the four disks become walls and the last one is the lid (or bottom, depending your choice), start storing your pencils and other stationeries in.

9. A Piece of Log for Your Pencil Case

A Piece of Log for Your Pencil Case
Source: https://medium.com/

This idea is more or less the same like the one with the cork placemats. The difference is, you have to clean the log up and stain them a bit. You need a driller too in order to put some holes on one site. Again, this is a platform for all your pencils and other stationeries.

10. A Pencil Pouch

A Pencil Pouch
Source: https://simplyfutbol.com/

A pencil pouch is also one of the easiest designs. It takes a stitching skill and a plenty of great choices of cloths. You can choose plain colours, those with patterns or motifs, thick materials…you name them. You can also add a zipper or a string of buttons to safely keep your stationeries in.

Surely, your little kids might enjoy these DIY Pencil Case projects. Not only they get to learn something and experiment firsthand, they can keep the results with them.

Sources:

10 Super Creative DIY Headphone Stands (Some are from Recycled Materials)

A DIY Headphone Stand From Half of A Bicycle Handlebar

Whether you are into music or an avid online gamer, spare headphones are some of the things that you need. Since an old-fashioned headphone is big, it takes up space. More of them tend to clutter your room. To solve that problem, you need a DIY Headphone Stand for them.

Of course, you may not want just a regular headphone stand. You can start creating your own. If you still have not got any ideas, some of these DIY Headphone Stand examples may help you:

1. The Wooden, DIY Headphone Stand

The Wooden, DIY Headphone Stand
Source:

Wood is the easiest material you can choose to make a DIY Headphone Stand. In fact, you can even use the recycled ones, whether it is from:

  • A makeshift, unused coat hanger.
  • A hanger for your bathroom towels.
  • What used to be the legs of a table.

For the last bit, you might need an extra woodwork. Make sure the wood is strong and solid enough to hold the headphone, since it can be pretty heavy.

2. Metal or Iron Bars That Used to Belong to Microphone Stands or Metal Chairs or Desks

[caption id="attachment_734" align="alignnone" width="800"]Metal or Iron Bars That Used to Belong to Microphone Stands or Metal Chairs or Desks Source: https://bolondonrestaurant.com/

Well, since the materials are more or less suitable with the headphones themselves, then why not? It is better that you use an old table microphone stand, since it is much shorter than the taller one. Surely, you would like to save some trouble cutting some parts, especially if you are not really into hard work.

You can modify the top a bit with plastic or fiber platforms. Once they are glued perfectly to the top, test their strength by hanging your headphones. If they do not break, then you have a DIY headphone stand.

3. A Hook Under The Table

A Hook Under The Table
Source: https://pinterest.com/

Yes, this idea might definitely amuse you. It starts off as hook to hang your bag under the table at the restaurant. After a while, why not do that with your headphone too?

Of course, you need to make sure that the hook is also strong enough for your headphones. Not only that, it should also be longer, since a headphone is different to a women’s handbag strap.

4. A DIY Headphone Stand from Cardboard Box Lids

A DIY Headphone Stand from Cardboard Box Lids
Source: https://bolondonrestaurant.com/

Do you see the rough edges of the cardboard box lids? That can also give you an interesting idea for a headphone stand. This is one of the examples.

The stuff that you need to create something like this include:

  • Old, unused cardboard boxes.
  • Big, strong scissors special for cutting thicker stuff (not just papers).
  • A cutter to shape and trim the edges.
  • A strong glue when needed.

Since this requires quite a hardwork and a lot of unused cardboard boxes, you can start with the designing first. Once you are done, start cutting and shaping the cardboard pieces in any way you like.

Join the pieces together with glue once you are done. You might want to trim the edges with a cutter. Try to stand it up first before hanging your headphone there. The thicker the piles glued together, the stronger it is to hold it.

5. A Plastic, DIY Headphone Stand

A Plastic, DIY Headphone Stand
Source: https://bolondonrestaurant.com/

This project can also solve the environmental issue called ‘plastic waste’. You can start with unused household things made of plastic. It takes some crafting skills (and also willingness) to turn trash into this treasure.

For example, there is a table lamp that you no longer use, especially with thicker, much wider frame. Remove the top and start trimming the edges. After that, hang your headphones there.

6. Relying on Your Action Figures or Dolls

Relying on Your Action Figures or Dolls
Source: https://pinterest.com/

Running out of ideas? Start relying on your superhero and let him solve your problem. No, just kidding. If you have some of the action figures you no longer want to play with, do not just leave them in the drawer or on a display case.

Scratch that. This Spiderman is can also be a single display, even with hanging headphones. Of course, the toy has to be big enough or it will topple over.

7. Your Former Doorknob

Your Former Doorknob
Source:

As interesting as this looks, never use the doorknob while it is still part of a real door. Either it will crash your headphones to the floor numerous times or you will be bugged by its inconvenience.

A better solution is to make sure the doorknob is no longer part of a real door. By attaching it to the wall of your bedroom, you have two functions, a DIY headphone stand and a unique decoration.

8. A Used Megaphone or a Giant Decorative Toy

[caption id="attachment_740" align="alignnone" width="800"]A Used Megaphone or a Giant Decorative Toy Source: https://pinterest.com/

If you have a megaphone you no longer use or a giant, decorative toy, this is the best way to maximise either to their fullest potential. To avoid cluttering your headphones on the floor or leaving them scattered on your desk, this is the saviour.

If it is a megaphone, just turn it over so the pointy part faces upward. You may add a few things as handler (fibres or plastic). If it is a giant toy like this one, just use it. Doesn’t it look cute in the picture?

9. An Old Painting Roller

Source:

So, this used to be a roller to paint your house or bedroom wall when you redecorated it. Big deal. After a while, the grip no longer feels steady, so you stop using it.

All you need is to change the screws inside the handler and add three little plastic (or fiber legs below. Make sure that it stands erect. Test its strength and durability with your headphones.

If it topples over, you might want to add another leg to keep it steady. If it is strong enough, then it is good to go.

10. A DIY Headphone Stand From Half of A Bicycle Handlebar

A DIY Headphone Stand From Half of A Bicycle Handlebar Source:

If you believe it creativity knows no limit. You can also use half of an old bicycle handlebar as a hook under the table. Since this is much bigger than the other hook, you might want to sit a bit farther away from it. It can bump or hurt you by accident.

You can attach it permanently under the table of your working desk. This arrangement is ideal if you are also a professional musician working from home.

So, these are the top ten of DIY headphone stand ideas. Which one do you prefer? Do you have your own ideas besides all of these?

Sources:

https://www.apartmenttherapy.com/the-most-clever-recycled-diy-h-140442

https://id.pinterest.com/pin/793055815605027656/

10 DIY DVD Storage Ideas That Might Steal Your Heart Away

The Alphabetical Order Filing

A collection of DVDs at home can be a source of entertainment on rainy days (and when your wifi does not work). Before you let your DVD library pile up and clutter, find a proper place to store all of them. With some of the DIY DVD Storage ideas, you can get an inspiration.

Some of these DIY DVD Storage ideas might already be familiar to you, while others are simply out of the box or something new. Do check them out before you decide to have at least one of your own.

1. An Ottoman For Your DIY DVD Storage

 An Ottoman For Your DIY DVD Storage
Source: https://marthastewart.com/

An ottoman does not only function as a seat or an extra coffee table. If it is big enough, you can even have a DIY DVD Storage under it. To begin with, you should:

  • Create a couple of holes on either side of the box of the ottoman. Make sure that each hole is big enough to store your collection.
  • You can have smaller boxes and put them into the holes. These boxes are also to store your DVDs by category. For example, one is for movies while another is for online games.

2. The Alphabetical Order Filing

The Alphabetical Order Filing - DIY DVD Storage Ideas
Source: https://hative.com/

Whatever the DVD box is, it is the filing system that matters. Besides storing them by category, you can also do that from A to Z. Creating the partition between alphabetical orders is pretty simple:

  • Use some extra, recycled papers and stickers.
  • Cut the papers in a suitable size and write letters on the stickers.
  • Stick the letters on the papers and the partitions are ready to be used. Slip each into the beginning of each letter category.

Of course, if you have a huge collection of DVDs, ordering them this way might take a while.

3. Crates on The Wall Where You Store Them All

Crates on The Wall Where You Store Them All
Source: http://nextluxury.com/

Do you have a vacant wall space that is not too big and not too small? You do not have to leave it empty. You can use that spot to store your DVDs.

This DIY DVD Storage idea uses some recycled products. In this case, the secondhand wooden crates are the best. With a little bit of measuring, cutting, and nailing to the wall, you have a set of authentic-looking DVD Storage. Now, all your collection is safely kept.

4. The Matching, Stylish Boxes

The Matching, Stylish Boxes - DIY DVD Storage Ideas
Source: https://marthastewart.com/

Okay, so you are only looking for these boxes to store your DVD collection. Still, why can’t they be stylish too? Besides, they are also very nice to look at. You will not even have a hard time finding them since they are all of the same colour.

To make it easy, you can rely on cookies and chocolate stores, where they usually have matching boxes. After you finish the containers, keep the boxes. Use them all for your DVDs instead.

5. The Old Shutter For Your DVD Collection

The Old Shutter For Your DVD Collection
Source: https://hative.com/

Shutters are not just perfect for doors and window panes. Believe it or not, you can also use them to store your DVD collection.

This idea may come up when you have your house renovated. Instead of leaving the old shutters unused and probably burned, why not put them to another good use? The shutters are automatically like book shelves.

For avid movie buffs, this DVD storage is not only for their DVDs. If they want to leave at least one or two shelves for movie magazines, then why not? You can re-create something from recycled products in any way you like.

6. The Built-In DVD Shelves

 The Built-In DVD Shelves
Source: http://nextluxury.com/

Yes, we are still using secondhand crates and wooden planks as materials. If you have a much bigger space on the wall, why not go horizontal instead of vertical with these built-in shelves for DVDs?

Since there is still enough space, going horizontally also means the possibility of storing more DVDs. If the highest shelf feels too tall for you or other family members at home, use a ladder.

Other suggestions related to this arrangement are:

  • You can also do this for your books.
  • If you have minors (children under 18) and you have adult movies, place them on the highest shelf of the whole batch. That way, they are out of the children’s reach. Hmm, you might also want to hide the ladder, just in case.

Also read: Storage Shelves in Small Spaces

7. The DIY DVD Storage on Wheels

 The DIY DVD Storage on Wheels
Source: https://marthastewart.com/

Feeling too lazy going away from your living room where the TV is? Drag the DVD storage with you. Although the basket here looks classic, the four wheels under it give a nice and functional addition.

You can also use this to drag around your family DVD collection to your kids’ bedroom when they are sick. Let them choose a funny, age-appropriate cartoon to make themselves feel better.

Also Read: 10 Super Creative DIY Headphone Stands

8. The Simple, DVD Storage Box or Single Shelf (Depending On How You See It).

The Simple, DVD Storage Box or Single Shelf (Depending On How You See It)
Source: https://hative.com/

Aside from the existing, unique DVD storage, you would probably still prefer something simple. This simple wooden box is huge enough to store as many DVDs as possible.

Since some of your collection might come in one big bundle of series, you can put them in at the back row of this box or shelf. The smaller ones can have the first row, which makes it easier for you to choose and reach.

9. The Built-In Book…Err, DVD Closet

The Built-In Book...Err, DVD Closet
Source: http://nextluxury.com/

If researchers have a whole closet of books, then musicians have it for their music DVDs. This also applies to movie-goers. A massive DVD collection definitely needs this built-in closet. Its glass-windowed doors will keep them safe as well as helping you to choose by a quick once-over.

Where do we usually put closets like this? A hobby room is a place to be.

10. The Industrial-Chic Storage Unit

The Industrial-Chic Storage Unit
Source: https://marthastewart.com/

For the artistic type, a regular DVD storage is not enough. This industrial-chic look will make a beautiful addition to your hobby room. Not only DVDs, you can also store other things like:

  • CDs.
  • Books.
  • Magazines.
  • Blankets and pillows.

Why limit the function when you can be more efficient with many? After all, that is what a hobby room is for.

These 10 DIY DVD Storage ideas are equally amazing and fantastic. Still, the final choice is in your hand. Which idea that has stolen your heart and made you fall in love?

Sources:

The Top 10 DIY Display Case Ideas for Creative Minds

Beautiful Display Cases for Your Essential Oil Collection

Whether to store a collection of your favourite stuff or part of a room decoration, a display case always makes a nice addition to your home. With the right DIY display case ideas, you know how to save your stuff while beautifying the room.

To create your own memorabilia or just to decorate the room, here are some of the best DIY display case ideas that might inspire you.

1. DIY Display Case for Your Toy Cars

DIY Display Case for Your Toy Cars
Source: https://donpedrobrooklyn.com/

Before you decide on your own display case for your toy car collection, make sure that:

  • All toys are mostly the same size. (If not, some of them should be stored somewhere else.)
  • There is an empty space at the walls for displaying your toy cars.
  • Make sure you know about woodworking and electrical problems if needed. (This is also required if there are cables right behind the wall.)

After that, you can start working. Make sure that each shelf of the display case is also the same size.

2. DIY Display Case for A Nice Decoration

DIY Display Case for A Nice Decoration
Source: https://donpedrobrooklyn.com/

This is one of the DIY Display Case Ideas that works more for a decoration. Taking up almost an entire wall, this one requires two basic materials:

  • Some black iron bars of good quality.
  • Some good quality wood planks. (If the surface is still rough, consider staining or finishing them first before applying them as a display case.)

Since this display case functions as a room interior design, do not store too many things on each shelf.

3. Another DIY Display Case for Your Toy Cars or Other Stuff Suitable

Another DIY Display Case for Your Toy Cars or Other Stuff Suitable
Source: https://donpedrobrooklyn.com/

This is another creative way to store your toy cars or other stuff suitable (for example jewelry pieces). Not only that, you can also be part of an environmental solution by using recycled stuff.

This display case can use either soda cans or biscuit cans. Once you collect them all, you can start painting them with the same colour that you like.

After that, glue them all together with the strongest glue possible. Use the same strong glue to paste them tight on the wall. Once you are sure they are strong enough to hold your cars or jewelry pieces, start storing them into each hole.

4. Beautiful Display Cases for Your Essential Oil Collection

Beautiful Display Cases for Your Essential Oil Collection
Source: http://www.detectview.com/

This is one of the DIY Display Case ideas that work not only as a decoration but to really store your stuff. Since vials of your essential oil are precious, you need a really safe space to store them. Do not let anything spill them out.

For starters, a large table can help you. On top of it, you can have three different shapes of display cases for artistic purposes and also functionality. You can even add an extra decoration which also functions the same. That small, wooden platform is so unique. It may remind you of a bear paw.

5. A Multi-Function Display Case

A Multi-Function Display Case
Source: https://donpedrobrooklyn.com/

Although this display case is used to store your favourite hot wheels, this does not mean it will not work for something else. Made of two different kinds of woods (one works as a partition and the darker planks are for platforms), you can also use this unique display case to:

  • Store your books.
  • Place your shoes (of course, in this case, the planks should be much bigger).

6. The Acrylic Display Case

The Acrylic Display Case
Source: http://www.detectview.com/

You might want to watch out with one of these fragile DIY Display Case ideas. Again, this decoration uses recycled products. You can see used glass bottles, a wood plank for the platform, and unused brass handlebars and glass partitions.

You can shape and paint the platform in any way you like, as long as it is big and strong enough to hold the bottles. Put some decorative (plastic) plants in each bottle before you cover the whole thing with glass partitions from both sides.

7. The Thematic, DIY Display Case (Again, for Your Hot Wheels)

 The Thematic, DIY Display Case (Again, for Your Hot Wheels)
Source: https://donpedrobrooklyn.com/

If you have a car tire you no longer use, do not throw it away. In fact, you can recycle it into something more useful – like this thematic display case sample.

To do so, you might need about two or three wooden planks, depending on how fit they might be in the middle of the tire. Some of the planks need to be cut or shortened in order to fit in. Before that, you can also paint them in any colour that you like.

Then wait for the paint to dry. After that, start fitting the planks in. They have to be the right size or the tire will not hold them up as shelves. Once the display case is done, you can put your hot wheels on each platform.

You can stand the tire or glue the lowest part onto the wooden floor. Whichever works, do as you please.

8. Another DIY Display Case for Your Essential Oil Collection (or Other Stuff Suitable)

Another DIY Display Case for Your Essential Oil Collection (or Other Stuff Suitable)
Source: http://www.detectview.com/

Think of this as a special cabinet for your precious essential oil collection. In fact, you may not have to work so hard to have this one ready. If you have an unused kitchen cabinet that you would like to dismantle, why not put it to good use like this?

You can add some handlebars as a barricade to protect the bottles and vials, so they will not drop and spill easily. Put this display case on a table and there you have it.

Another alternative: besides essential oil, you can use this display case for your art kit, including your pastel oil collection.

9. Another Toy Car Display Case Idea

Another Toy Car Display Case Idea
Source: https://donpedrobrooklyn.com/

They are toy cars, but very old ones with metal bottoms. This idea is more for a decoration instead of storing toys. If the old toy cars do not have metal bottoms, glue some before you put them against these metal panels built into the wall.

This decoration will make a nice playroom – or a masculine touch to a boy’s bedroom.

10. The Lego Memorabilia

 The Lego Memorabilia
Source: http://www.detectview.com/

Going crazy over the missing Lego pieces? You do not have to go through that anymore with this display case. Again, you can use an old but still functional cabinet. You can add another board on one side to secure the Lego collection and leave the other one open for a show.

You can get really creative with these DIY display case ideas. So, which one do you like best?

10 DIY Computer Desk Ideas That Will Fire Up Your Spirit Working from Home

A Perfect DIY Computer Desk for Writers and Researchers

Whether you are a freelancer or just in need to bring work home, you need the right desk. If you feel that you have not got any that is suitable, why not have your DIY computer desk ideas? That way, you can create your own workspace at home. That should also feel more comfortable.

Still need some examples? Some of these DIY computer desk ideas are easy to work on. That way, you will not have to spend so much money by hiring professionals. You also get to decide your own style of desk.

1. The Desk Transformation (inspired by Pottery Barn)

The Desk Transformation (inspired by Pottery Barn)

Source: https://homedit.com/Just use one corner of the room for this desk of yours. Setting this up is pretty easy:

  • Join three tables together into an L-shape. Make sure their shapes are suited to be placed in the corner.
  • Use the right wood boards as the desktop. You can either stain or finish the surface before you paint them.
  • Place the matching drawers under both ends of the makeshift working desk. Build them into the design, so they become part of the computer desk.
  • Start painting the whole desk and decorating the top. Yes, that includes setting up your computer electrical system too.

2. DIY Standing Computer Desk

DIY Standing Computer Desk
Source: https://homedit.com/

Suffering from a backpain after sitting too long? Here is a solution for you: a standing desk. A little bit inspired by the typical university hall podium, you can create your own this way:

  • Choose a short drawer that is strong enough as a foundation.
  • By using four metal bars as supporters and a good quality wooden board, build your standing desk for your computer.
  • Set up your working desk with your computer and a small desk lamp.

This desk is an alternative if you feel like stretching up a bit as well.

3. DIY Black Computer Desk

DIY Black Computer Desk
Source: https://ryanscott2go.com/

If you prefer a plain and simple DIY Computer desk, this all-black one will make it easy on you. It is not difficult to find a matching large black desk and a proper chair with the matching colour.

To emphasise your workspace, a black carpeting on the wooden floor will create a visible boundary. Once the table and chair are on it, then you can start setting up your computer and tablet on top of the table. Plus, the extra lamp.

If you do not feel like having your working desk look too plain, a potted plant will make a nice decoration.

4. Your Mini Laptop Desk

Your Mini Laptop Desk
Source: https://homedit.com/

You have a laptop and only a limited space for work at home. No worries, you can still create your own workspace as efficient and compact as possible.

By installing a small, wooden table into one side of the wall, you get your own mini laptop desk. You can even paint it with a bright colour to make it look less ordinary. For example: orange for this mini laptop desk and a grey chair.

5. A Home Studio Desk

A Home Studio Desk
Source: https://homedit.com/

As a musician or a music composer, you definitely need a decent workspace – with the right desk – at home. With four iron bars as legs and two black wooden boards as tabletops, start creating your dream home studio desk.

To make this DIY Computer Desk for musicians come true, make sure that:

  • The desk is big enough to have your computer, keyboard, and other stuff related to your work.
  • There is still plenty of space under the table for more wires.

6. A Perfect DIY Computer Desk for Writers and Researchers

A Perfect DIY Computer Desk for Writers and Researchers
Source: https://ryanscott2go.com/

From how this DIY Computer Desk, you can say that this is the extensive version of the L-shaped one. The L-shaped one is inspired by Pottery Barn, but this one is a little different, because:

  • The L-shaped is reversed to face against the wall. This is also as an emphasis of your working space at home.
  • Besides the twin black drawers at one end, there are tiny bookshelves on the opposite side.

With solid wood as the top, this desk is perfect for writers and researchers. You get to focus better at work here.

7. The Birch and Aluminum Desk

The Birch and Aluminum Desk
Source: https://homedit.com/

This make shift desk is normally chosen by students or teenagers. A nice combination of birch and aluminum makes a unique pattern on top. The table light is also the right fit to help you studying, whether writing or reading a textbook.

You can store your books or other nooks and crannies at the built-in, wooden shelves above the table. That will clear up some decent space on the desktop. The material has to be durable too.

8. A Compact and Simple, DIY Computer Desk

A Compact and Simple, DIY Computer Desk
Source: https://pinterest.com/

Sometimes, a DIY computer desk can be just compact and simple. What matters more is the good quality materials to create one. For example: teak or mahogany for this desktop.

Of course, matching drawers are still needed. In fact, the drawers must also be solid as supporters. With this design, you do not need four iron bars as legs. These drawers are strong enough.

Do not forget to add another hidden shelf under the desktop. Arrange the shelf so you can drag it out whenever you need to. That is where you put your keyboard for your computer.

9. The Custom Desk Project

The Custom Desk Project
Source: https://homedit.com/

Since this desk also looks appealing, how to make one like this?

  • Decide the dimension that you want.
  • Buy the right wood for the desktop. Use three planks of pine.
  • Sand and stain the wood with a foam brush. Apply three coats.
  • Use some cabinets as the base.
  • Place the planks on top and line them up.
  • Secure the planks together.

See how easy it is to make this custom desk?

10. DIY Electric Computer Desk

DIY Electric Computer Desk
Source: https://ryanscott2go.com/

Last but not least, here is another DIY computer desk focusing more on functionality. Still simple with a wooden plank as the top, a different touch is a glass plank as the cover.

For the matching legs, create a pair of open shelves, also with glass planks to mark each shelf. Those are for your hard drive and anything else you would like to connect. For example: an external hard drive.

There are many ways to create the best DIY computer desk at home. Which one of these that suits your fancy? Hope it will fire up your spirit as you finish your work there.

4 Above Ground Pool Deck Ideas – Affordable and Astonishing!

A Pool with Terraced Deck

Above ground pool deck ideas are many, but people often have problems when choosing the right one for their house. What about you? Before giving examples, you need to learn further information here.

As the name suggests, this ground pool located on the above ground and features a deck.

Above Ground Pool Deck Ideas

This becomes more popular these days! Why is that, people want to create a lounge space beside their swimming pool.

All modern homeowners would like the concept. Not to mention you can find a wide array of designs out there. Once installed, it would be a great place to spend good times with either family or friends!

1. A Pool with Terraced Deck

A Pool with Terraced Deck
image source: diynetwork.com

Once summer comes, there is no better idea than to spend a relaxing time at an above ground pool deck. To improve the comfort, you can install a terraced deck on it.

Well, the picture above applies a minimalist terraced deck design. You will not find modern patios and deck there. Instead, traditional wood materials and natural views become the prime treats!

The design also gives both privacy and soothing color. Some gravels and chunks of stones decorate the sides of the pool. Still, it is built above the ground! Moreover, only several outdoor patios are available.

Both chairs and desks are located inside and the edge of the fences. The purpose is to give the best scenery. As for the pool, it applies a small and irregular shape.

To make the design more outstanding, you need to include natural elements. These include grasses and stamped concrete! What is next? The pool resides beside the main house and a small bridge connects it.

The pool entry also looks nice, doesn’t it?

2. An Automatic Cover Feature

An Automatic Cover Feature
image source: thepoolcleanerexpert.com

Like regular pools, your above-ground-pool deck needs proper maintenance. Cleaning regularly is a good idea. However, it is also important to prevent debris and other water pollutants.

Here is an idea. Why don’t you install an automatic cover to your ground pool deck? Even though it may cost some money, the result is satisfying. The cover can open and close mechanically!

One of the reasons to get this feature is to cut down on energy and water cost. It also helps to reduce evaporation. What is more? Another best benefit is to save time!

Based on the picture above, the cover of the pool must suit the size of the container. As for the deck, you can use either a small or a big one, based on the pool’s diameter.

Before installing the cover, you must work with a wooden deck first around the pool. After that, you must call an expert to get the right cover material. Usually, it also features aluminum tracks!

3. Above Ground Pool Deck with Step Section

Above Ground Pool Deck with Step Section
image source: thespruce.com

Having an above ground pool deck makes you climb or reach that pool properly. The simplest way to simplify the effort is by installing a step section. It can be either regular ladders or sophisticated ones.

Some people choose an oversized step section while others are fond of a walk-around feature. Well, the options are many, after all. As for the picture above, it comes with a composite deck.

The merged deck is built as a path around the pool. Not to mention it functions as a doorway platform. The next noticeable feature is a jumbo step entrance system.

Not only is the entrance good looking, but also it is sturdy enough to support many people. What is more? As an addition, there is a wicker seating set. It provides a nice spot to relax and hang out!

The seating set is also equipped with an umbrella, which is useful to prevent the heat of the sun at noon. Another great thing is the location.

This pool resides in the middle of a stunning garden, featuring various plants.

4. Enclosed Above Ground Pool Deck

Enclosed Above Ground Pool Deck
image source: threeparkstreet.com

What does an enclosed above ground pool deck mean? A word that represents it is none other than privacy. On the picture above, you may see a pool that is surrounded by shady trees and dense bushes.

It looks like a private haven! There is a symmetrical swimming pool, surrounded by a clean white foundation. Above it, you may find a comfortable small spa featuring a tiny water work.

Several garden ornaments reside there, including lamps, patio seating, and colorful bushes. Fortunately, you can add more features based on your preferences. No one would disturb your comfort in this pool!

As an alternative, when creating an enclosed above ground pool deck, you can apply other barriers. Aside from using dense trees and bushes, other good options are fences, walls, and gates.

The aim is to create a private paradise! A nice swimming pool is one thing. Other important aspects must be included! For instance, you can use outdoor amenities, container gardens, and comfortable seating.

As a great extra, you can include cold beverages and extra towels. Sometimes, it is good to invite your friends to this small piece of heaven, isn’t it?

Summary

After picking one of the most recommended designs above, your next move is to find a quality builder. Even though it is possible to build a DIY pool deck above the ground, it may cost much time for you.

Instead of spending your time and efforts, it is better to hire a professional builder. The requirement is only the best design. Above ground pool deck ideas are many, but your preference would be only one.